Interactive flip-up crochet chameleon coaster pattern
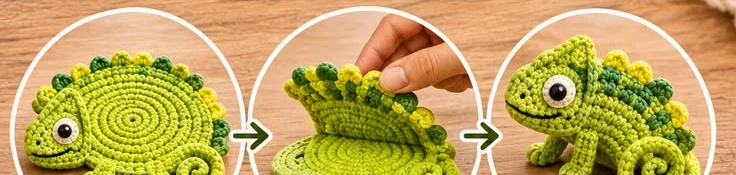
A clever 2-in-1 pattern: a practical flat cotton mug coaster that folds and flips up into a freestanding 3D chameleon amigurumi friend.
By YarnHook
|6 min read
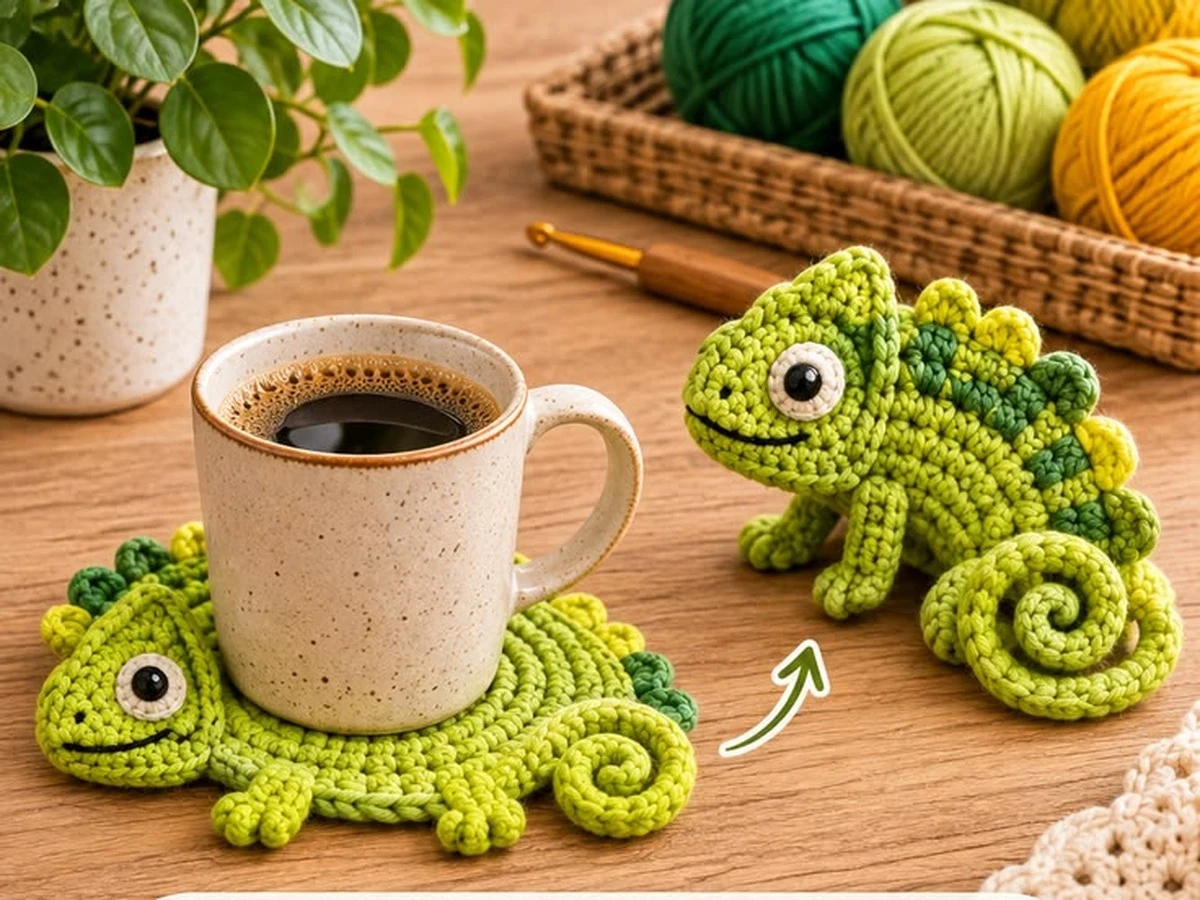
This interactive crochet chameleon coaster is one of the most delightful projects you can make for your desk or coffee table. When you're sipping your morning drink, it serves as a sturdy, absorbent cotton mug rug. When your mug is empty, a gentle fold along the back hinge transforms the flat coaster into a freestanding 3D amigurumi chameleon complete with curled tail, little toes, and colorful dorsal ridges!
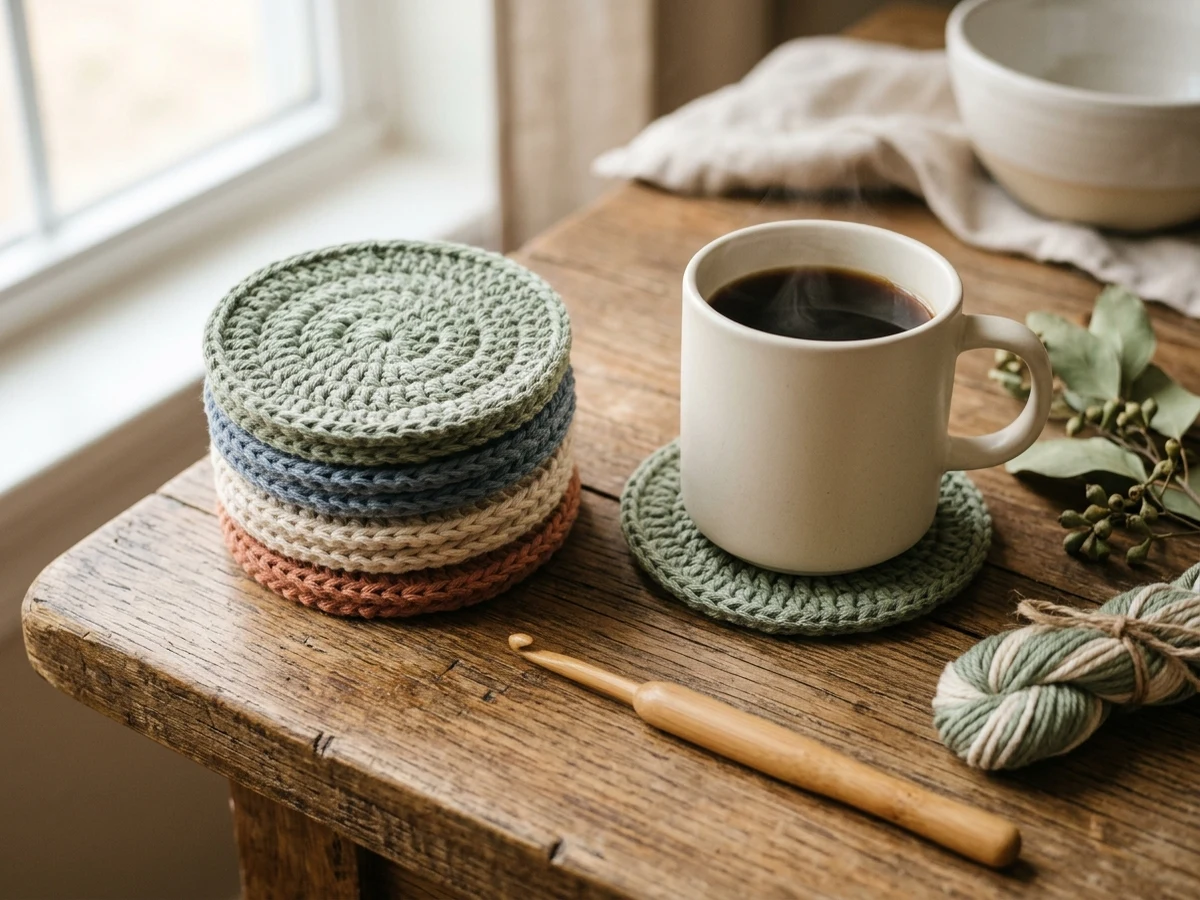
If you've already made our classic cotton coasters, this pattern uses the same round-by-round increase foundation with a playful amigurumi twist.
Materials
- Worsted weight cotton (#4):
- Color A (Lime Green): approx. 45 yd (body, head, legs, tail)
- Color B (Forest Green): approx. 12 yd (dorsal crest & side ridges)
- Color C (Sunny Yellow): approx. 8 yd (crest tips & eye ring accents)
- Crochet hook: 3.5 mm (E-4) — using a slightly smaller hook with worsted cotton creates dense, firm stitches that help the 3D figure stand tall
- Eyes: A pair of 8 mm black safety eyes (or black embroidery cotton for baby-safe makes)
- Stuffing: A small handful of polyester fiberfill (for the head dome only)
- Notions: Stitch marker, tapestry needle, and scissors
Gauge & Finished Size
- Gauge: 10 sc and 10 rounds = 2 in (5 cm) worked in continuous spiral rounds.
- Finished measurements: Coaster base measures 4.5 in (11.5 cm) in diameter (excluding legs and tail). Standing 3D chameleon stands approx. 3 in (7.5 cm) high.
Stitch Abbreviations (US Terms)
- MR: Magic Ring
- sc: single crochet (see our basic crochet stitches guide)
- inc: increase (2 sc in the same stitch)
- dec: invisible decrease
- ch: chain
- sl st: slip stitch
- hdc: half double crochet
- BLO: back loop only
- FLO: front loop only
- st(s): stitch(es)
Part 1: Lower Coaster Base (Color A)
The lower base is worked in a smooth spiral to provide a stable, level rest for your mug.
- Round 1: In a MR, work 6 sc. Pull ring tightly closed. (6 sts)
- Round 2: Inc in each st around. (12 sts)
- Round 3: [sc in next st, inc] × 6. (18 sts)
- Round 4: [sc in next 2 sts, inc] × 6. (24 sts)
- Round 5: [sc in next 3 sts, inc] × 6. (30 sts)
- Round 6: [sc in next 4 sts, inc] × 6. (36 sts)
- Round 7: [sc in next 5 sts, inc] × 6. (42 sts)
- Round 8: [sc in next 6 sts, inc] × 6. (48 sts)
Sl st in next st, fasten off, and weave in the center starting tail. Leave the outer edge unfastened or clip a marker into the last loop.
Part 2: Upper Flip Shell (Color A)
Work Rounds 1–7 identical to the Lower Base.
- Round 8 (Ridge Hinge Round): [sc in next 6 sts, inc] × 4, sc in next 6 sts, then work the final 6 stitches through BLO only. (48 sts)
- Do not fasten off. We will build the dorsal crest directly along the spine in Part 4.
Part 3: The Chameleon Head & Snout
The head is worked separately in Color A and lightly stuffed so it keeps its animated character.
- Round 1: In a MR, work 6 sc. (6 sts)
- Round 2: [sc in next st, inc] × 3. (9 sts)
- Round 3: [sc in next 2 sts, inc] × 3. (12 sts)
- Round 4: [sc in next 3 sts, inc] × 3. (15 sts)
- Round 5: [sc in next 4 sts, inc] × 3. (18 sts)
- Rounds 6–8: sc in each st around. (18 sts for 3 rounds)
Eyes & Assembly:
- With Color C (Yellow), make 2 eye patches: In a MR, work 6 sc, sl st to join. Fasten off leaving a 6 in tail.
- Insert 8 mm black safety eyes through the center of each yellow ring, then secure between Rounds 5 and 6 on either side of the head, roughly 6 stitches apart.
- Lightly stuff the head with fiberfill.
- Round 9: [sc in next st, dec] × 6. (12 sts)
- Round 10: dec × 6. (6 sts) Fasten off leaving a 12 in tail. Using a tapestry needle, embroider a tiny curved mouth line in black yarn.
Part 4: Dorsal Ridge Spikes (Colors B & C)
The colorful scalloped spikes along the back give the chameleon its authentic reptile charm:
- Join Color B (Forest Green) at the top of the upper shell ridge.
- Work along the edge: [sl st, skip 1 st, 5 hdc in next st, skip 1 st, sl st in next st] across the spine to create 6 textured scallop crests.
- Fasten off Color B. Join Color C (Sunny Yellow) into the center peak stitch of alternating scallops: [ch 2, sl st in same st] to create yellow spike highlights. Fasten off and weave in ends.
Part 5: The Curled Tail (Color A)
A chameleon wouldn't be complete without its signature spiral tail!
- At the rear lower edge of the coaster base, join Color A with a slip stitch.
- Foundation: Ch 16.
- Row 1: Work 2 sc in 2nd ch from hook, 2 sc in each of the next 7 chains (this creates the natural tight curl), then sc in each remaining chain back to the body.
- Sl st firmly into the coaster base edge to anchor the tail. Fasten off and weave in the tail end.
Part 6: Little Feet & Toes (Color A - Make 4)
- Attach yarn at the marked leg positions (two on the left, two on the right):
- Leg stem: Ch 5.
- Toes: In the 2nd ch from hook, work [sl st, ch 2, sl st in 2nd ch from hook] twice to form a classic two-pronged chameleon foot.
- Sl st back along the remaining 3 foundation chains into the body.
- Fasten off and repeat for the remaining three legs.
Assembly & How to Flip
- Attach the Head: Sew the base of the head securely to the front edge of the Upper Flip Shell using the yarn tail.
- Align the Shells: Place the Lower Base and Upper Shell wrong sides together. Using a yarn needle and Color A, seam the back hinge section (approx. 14 stitches across the rear) securely. Leave the front and sides free so the top can lift.
- How to Use:
- Mug Rug Mode: Lay the coaster flat on your table. Both layers rest completely flush, and your coffee mug or cold drink sits safely on the center cotton surface.
- Desk Buddy Mode: When you lift your cup, fold the upper shell in half along the dorsal ridge. The tension will cause the front legs to splay and the head to rise into an alert, standing 3D posture!
Care & Washing Instructions
Because this coaster is made with 100% cotton, it is durable and easy to maintain:
- Hand wash or machine wash on a delicate cycle in a mesh laundry bag with cool water.
- Reshape flat with your hands and air dry on a towel.
- If desired, lightly press the lower circular base with a steam iron (avoiding plastic safety eyes) to restore crisp, flat edges.
Questions about this pattern
What yarn is best for an interactive crochet coaster?
Always use 100% worsted weight cotton yarn. Cotton is heat-resistant, highly absorbent against cup condensation, and holds the structural shape needed for the chameleon to stand upright firmly when folded.
How does the chameleon coaster flip up into 3D?
The body is constructed from two linked circular panels joined at the rear spine. When flat, both layers lay flush under your mug. When lifted, folding the top panel along the spinal ridge pushes the legs down, allowing the chameleon to stand freely as a 3D desk companion.
Can a beginner crochet this coaster?
Yes! If you know how to make a magic ring, single crochet, and work increases in the round, you can finish this project in an afternoon. The legs and crest are worked with simple chain and slip-stitch combinations.
How do I prevent my crochet coaster from curling?
Maintain even tension throughout your increase rounds. If your circle cups, switch to a hook half a millimeter larger. Steam blocking the finished flat base ensures crisp, flat edges that sit level under any coffee mug.
YarnHook
Free crochet patterns and tutorials
YarnHook publishes free crochet patterns and tutorials in plain language, using US crochet terms.